Minecraft Controller
Learn how to code your Piper Command Center to become a DIY Minecraft game controller
To do this project, you will need a Piper Computer Kit and a Piper Command Center (Beta)
Skills & Time

Time: 30 minutes Skills: Electronics, Coding Skill Level: Moderate
(Note: 30 minute time estimate if Piper Command Center is already built.)
Objective:
Use your Piper Command Center to build the ultimate controller to play Minecraft on a Piper Computer Kit or computer.
Project Overview:
Step 1: Collect all your materials.
- Screwdriver
- Piper Command Center
- Piper Computer Kit
- From your storage chest in the Piper Computer Kit, grab the following:
- 4x Wires - Black, Blue, Green, and Yellow
- 3x Mini Buttons
Step 2:
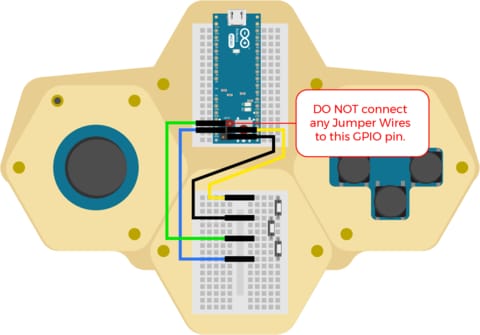
- Remove Command Center’s Lid (Part ⑦ or ⑧)
- Remove the black plastic cover from the 6 pins resting next to the red reset button.
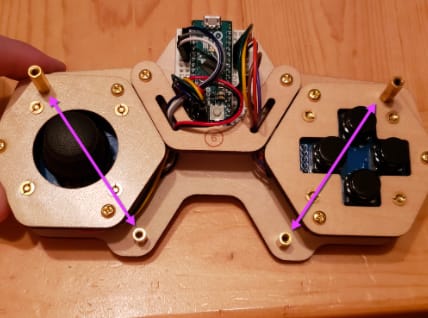
Step 3:
- Switch x2 11/32” standoffs for the Lid with x2 ⅝” standoffs used to attach the Breadboard Puck
- Screw the Breadboard puck onto the 11/32” standoffs
Step 4:
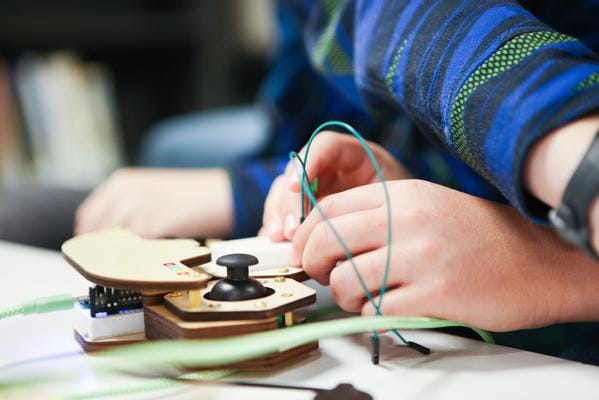
- Attach 3x Mini Buttons onto the Breadboard Puck as shown below.
- Wire the Black, Green, Blue, and Yellow wires as shown below.
Step 5: Download the Arduino IDE
- Insert the controller’s USB braided cable into a USB port on your desktop Computer
- Confirm you have downloaded the Arduino IDE to your desktop computer. If not, follow these instructions: https://www.arduino.cc/en/main/software
- Open Arduino’s IDE and launch a new sketch.
Step 6: Load the Firmware
- Copy and Paste the code listed below into the Arduino IDE Sketch.
- Once pasted, upload the code.
- Having issues? Check your port and board connection under the tools menu.
|
// Arduino libraries to control the mouse and keyboard #include <Keyboard.h> #include <Mouse.h> ///////////////////////////////////////////////////////////////////////// // Pin mappings to Arduino Micro according to the assembly instructions enum ArduinoPinMap { // Joystick Movement VerticalAxisPin = A0, HorizontalAxisPin = A1, // Click & Button Pins LeftButtonPin = 8, RightButtonPin = 9, UpButtonPin = 6, DownButtonPin = 7, JoystickPressPin = 13, // Extra Buttons TopButtonPin = MOSI, MiddleButtonPin = MISO, BottomButtonPin = SCK, }; ///////////////////////////////////////////////////////////////////////// enum InputAction { LeftButton = 0, RightButton, UpButton, DownButton,
JoystickLeft, JoystickRight, JoystickUp, JoystickDown, JoystickPress,
TopButton, MiddleButton, }; #define NOT_MAPPED 0 // Eight elements to correspond to the button. Each map to a keyboard action // Change these to map the buttons in Keyboard Mode const int InputMap[11] = { 'a', // LeftButton 'd', // RightButton 'w', // UpButton 's', // DownButton NOT_MAPPED, // JoystickLeft NOT_MAPPED, // JoystickRight NOT_MAPPED, // JoystickUp NOT_MAPPED, // JoystickDown ' ', // JoystickPress MOUSE_RIGHT, // TopButton MOUSE_LEFT, // MiddleButton }; const int InputMapModified[11] = { 'a', // LeftButton 'd', // RightButton KEY_ESC, // UpButton 's', // DownButton NOT_MAPPED, // JoystickLeft NOT_MAPPED, // JoystickRight MOUSE_MIDDLE, // JoystickUp 'e', // JoystickDown KEY_LEFT_SHIFT, // JoystickPress MOUSE_RIGHT, // TopButton MOUSE_LEFT, // MiddleButton }; // State of the modifier buttons int isModifierPressed = 0; int wasModifierPressed = 0; // State of any buttons that can be modified int isMouseMiddlePressed = 0; int isEkeyPressed = 0; int isEscPressed = 0; int isShiftPressed = 0; int isSpacePressed = 0; int isWkeyPressed = 0; // This is set on the mode toggle const int *currentModeMap = InputMap; const int AxisMaxInput = 1023; const int AxisMaxOutput = 16; const uint8_t MOUSE_MOVE_DELAY = 8; // Global variable for the last time the mouse (aka joystick) was moved unsigned long lastMouseMovement = 0; int MappedThreshold = 3; // resting threshold, mapped int MappedCenter = AxisMaxOutput / 2; // resting position value, mapped void getControllerMap() { if (isModifierPressed) { currentModeMap = InputMap; } else { currentModeMap = InputMapModified; } } // Reads an axis (data pin) and scales the analog input range to a range // from 0 to <range> int readAxis(int axis) { // Read the analog input int reading = analogRead(axis); // Map the reading from the analog input range to the output range: int mappedReading = map(reading, 0, AxisMaxInput, 0, AxisMaxOutput); // If the output reading is outside from the rest position threshold, use it: int distanceFromCenter = mappedReading - MappedCenter; if (abs(distanceFromCenter) < MappedThreshold) { distanceFromCenter = 0; } // Return the distance for this axis: return distanceFromCenter; } // Converts a button from the InputAction enum into a mouse or keyboard press void buttonPress(InputAction button, bool isPress) { getControllerMap();
int action = currentModeMap[button]; if ((action == MOUSE_RIGHT) || (action == MOUSE_LEFT) || (action == MOUSE_MIDDLE)) { if (isPress) { Mouse.press(action); if (action == MOUSE_MIDDLE) { isMouseMiddlePressed = 1; } } else { Mouse.release(action); } } else { if (isPress) { Keyboard.press(action); // If any of the modified keys have been pressed, save them so they can be // released if the modifier button is let go switch (action) { case 'e': isEkeyPressed = 1; break; case KEY_LEFT_SHIFT: isShiftPressed = 1; break; case ' ': isSpacePressed = 1; break; case KEY_ESC: isEscPressed = 1; break; case 'w': isWkeyPressed = 1; break; } } else { Keyboard.release(action); } } } void handleJoystick() { int horizontalInput = readAxis(HorizontalAxisPin); int verticalInput = readAxis(VerticalAxisPin);
if (isModifierPressed) { // Take the horizontal and vertical input and move the mouse Mouse.move(horizontalInput, verticalInput, 0); } else { Mouse.move(0, 0, horizontalInput / 2); buttonPress(JoystickUp, verticalInput < -MappedThreshold); buttonPress(JoystickDown, verticalInput > MappedThreshold); } } void handleButtons() { // Get the state of the modifier Button (BottomButtonPin) // and store the previous state of the modifier button (to see if it changed) pinMode(MiddleButtonPin, OUTPUT); digitalWrite(MiddleButtonPin, LOW); delayMicroseconds(25); wasModifierPressed = isModifierPressed; isModifierPressed = digitalRead(BottomButtonPin); pinMode(MiddleButtonPin, INPUT_PULLUP); // Get the states of the rest of the buttons buttonPress(RightButton, digitalRead(RightButtonPin) == LOW); buttonPress(LeftButton, digitalRead(LeftButtonPin) == LOW); buttonPress(UpButton, digitalRead(UpButtonPin) == LOW); buttonPress(DownButton, digitalRead(DownButtonPin) == LOW); buttonPress(JoystickPress, digitalRead(JoystickPressPin) == LOW); buttonPress(TopButton, digitalRead(TopButtonPin) == LOW); buttonPress(MiddleButton, digitalRead(MiddleButtonPin) == LOW); // If the modifier button changed, then release any buttons that have been modified // to prevent them from getting "stuck" if (isModifierPressed != wasModifierPressed) { if (isMouseMiddlePressed) { Mouse.release(MOUSE_MIDDLE); } if (isEkeyPressed) { Keyboard.release('e'); } if (isShiftPressed) { Keyboard.release(KEY_LEFT_SHIFT); } if (isSpacePressed) { Keyboard.release(' '); } if (isEscPressed) { Keyboard.release(KEY_ESC); } if (isWkeyPressed) { Keyboard.release('w'); } } } // Called from the loop to handle input from the pins. We break up the // handling into joystick and buttons void processInput() { unsigned long currentTime = millis(); int delayTime = MOUSE_MOVE_DELAY; // The scroll wheel moves really fast, so increase the mouse movement delay // if the modifier button is pressed if (!isModifierPressed) { delayTime = delayTime * 12; } if (currentTime - lastMouseMovement >= delayTime) { // Space out joystick actions. This is especially for the joystick // button, which sends multiple events for one press handleJoystick(); lastMouseMovement = currentTime; } handleButtons(); } // Arduino setup, called in the beginning on the startup void setup() { // Setup input for all the pins pinMode(HorizontalAxisPin, INPUT); pinMode(VerticalAxisPin, INPUT); pinMode(LeftButtonPin, INPUT_PULLUP); pinMode(RightButtonPin, INPUT_PULLUP); pinMode(UpButtonPin, INPUT_PULLUP); pinMode(DownButtonPin, INPUT_PULLUP); pinMode(JoystickPressPin, INPUT_PULLUP); pinMode(TopButtonPin, INPUT_PULLUP); pinMode(MiddleButtonPin, INPUT_PULLUP); pinMode(BottomButtonPin, INPUT_PULLUP); Mouse.begin(); Keyboard.begin(); } // Main Arduino Program Loop void loop() { // Loop forever, checking the pins for input processInput(); } |
Step 7: Ready to control
- Check your key mapping. If your controller’s joystick or buttons are not working properly, check your code or wiring.
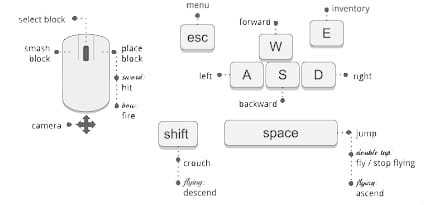
Key mapping for Minecraft Pi Edition
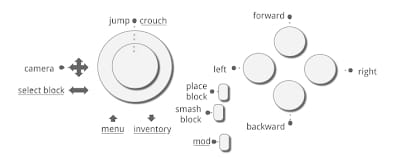
Key mapping for the Piper Command Center Minecraft Controller
Step 8: What does each button do?
- Press the joystick down to make your player jump.
- The “Mod” Button changes how some of the buttons work
- Hold down the “Mod” button, press down the joystick, and your player will crouch instead.
- Additional uses for the “Mod” button are:
- Access inventory
- Select a block in the bottom bar
- Exit to the menu
Step 9: Check your work
- When everything is working correctly, screw a Lid back onto the Piper Command Center and PLAY!
- Do not like how a button functions? Want to hack or customize? Modify the buttons’ function in the code. Have fun and explore!
