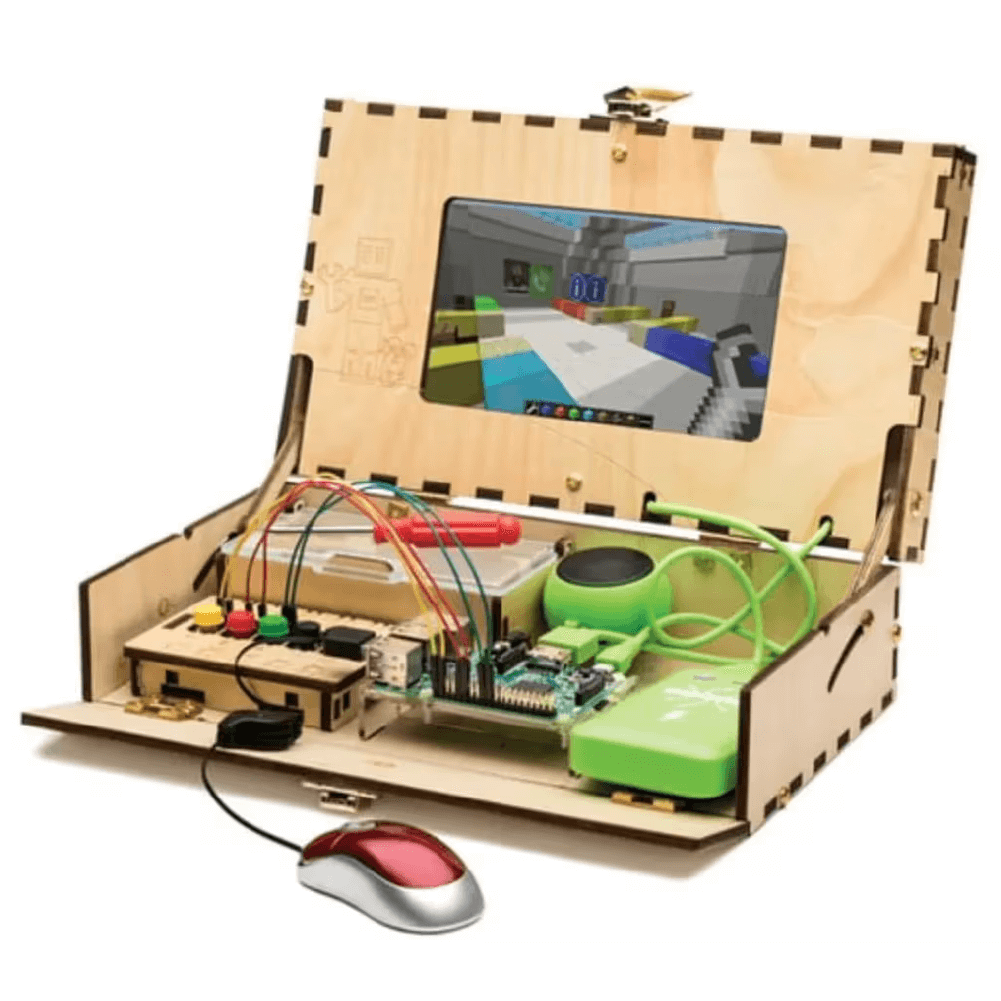
Your instructions are inside the Minecraft games. To access the instructions find the Crafting Table (blue block with an "i" for information, as shown below) within each game. Make sure to use your mouse scroll wheel to select the wrench from your inventory, then use your mouse to "right click" the Crafting Table. This will open up the "fancy schmancy digitizer" and provide instructions on how to wire up the hardware using breadboards, inputs, outputs and your Raspberry Pi.
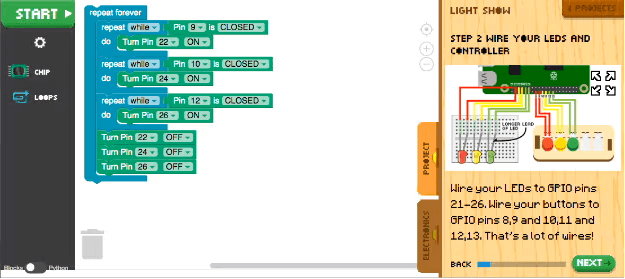
Below is the fancy schmancy digitizer which shows how the student should wire up their input or output from the breadboard to the Raspberry Pi. You will see these instructions when you click on the Crafting Table.
PiperCode, step-by-step instructions are on the right side of the screen for each project. The steps include building your hardware and code.
What version of the Raspberry Pi is included in the Piper Computer Kit?
The Piper Computer Kit includes a Raspberry Pi 3 Model B v1.2.
We like the 3 Model B V1.2 because of its low power consumption and ability to run our programs efficiently. The Raspberry Pi 4 is awesome! But, we found it used more power, meaning less battery life - and the new features did not make a significant enough difference in performance versus the 3 Model B V1.2.
I need replacement parts. What do I do?
Use your blueprint to find the part name or product number (tip: wood pieces are labeled on part) which you need and then contact the Piper Customer Service team by emailing: hi@playpiper.com. Identify the Piper Computer Kit model and the exact part number(s) you are interested in purchasing.
Our team will then reply with any additional questions or a quote for the products.
Software Issues
How do I update my software?
The highest level of software that works with the V4B is 2.8.2. We've written up instructions on how to access your software update here:
My Piper Computer Kit screen is only displaying blue to black?
So you have your Piper Computer Kit assembled, but when you try to turn it on the screen either goes from Blue to Black or says No Signal. Let’s go through some steps that could explain why your screen is acting up.
Check your Raspberry Pi for lights. A Raspberry Pi that is working correctly will have a solid red light and a blinking green light on the upper right area of the Raspberry Pi when powered on.
If you do not see a red light this means your Pi is not getting power. There could be two main causes of this (a) the green cable between your battery and the Raspberry Pi is not working properly or (b) your battery is not providing power.
If you have a red light, but no green light this means your Raspberry Pi is getting power, but it is not reading the SD Card.
If you have a red light and a blinking green light, this means your Raspberry Pi is receiving power, but the screen is not getting a connection
If you do not see a red light
If you have a Micro USB to USB cable that you can use let's see if that cable works. Plug the USB side into the Piper battery and the Micro USB to the Raspberry Pi. If the lights come on, the issue was your Harness Cable.
If that did not work, the issue may be your battery. Check to make sure the battery is charged and is showing lights on the top of the battery when you turn it on. If no lights appear on the battery, try charging it. Alternatively, you may power your Piper Computer Kit from a wall outlet instead of the Piper battery. To do this you will need a long Micro USB to USB cable along with a wall adapter. If this method works, your battery may need to be replaced.
If you have a red light, but no green light
First, try pulling your SD Card out (it's underside the Raspberry Pi, on the right side near the battery) and re-inserting it a few times. This can clear any dust or grime off the connectors. After this, make sure your SD Card is firmly inserted into its slot.
If that doesn't work, follow this guide (Scroll down to the header titled, “Download and Install Piper SD Card Image”) on how to reflash your card and you should be up and on your way. If you are unable to flash your card, contact us at hi@playpiper.com to get this issue sorted out.
If you have a red light and a blinking green light
Follow this helpful video and make sure all your connections are safe and secure.
This issue is most commonly caused by the HDMI cable not being inserted all the way either at the Raspberry Pi or behind the screen where the HDMI connects to the screen driver board.
If that doesn’t work, trying switching out your HDMI cable with another one you may have that you know works properly. If your new HDMI cable works, you need a new HDMI cable.
If the HDMI cable did not solve your issue, try hooking your Piper Computer Kit to another display, such as a TV or computer monitor. If you see an image, this means your screen is the issue.
If none of these options work, it may mean that the HDMI port on your Raspberry Pi is defective and needs to be replaced.
My Piper Computer Kit displays "No Signal" on the screen?
When powering on your Piper Computer Kit, if the screen displays "No Signal" read this article for troubleshooting.
If your screen display states "No Signal" this tells us that the screen has power from the battery but is not receiving a signal from the Raspberry Pi.
Check all the connections from the back of the screen to the Raspberry Pi. Often times the connection on the back of the screen is not properly inserted which would cause this issue.
If the connections all look good and you are still having the same issue and you have another HDMI cable, try switching out the Piper HDMI cable with a different HDMI cable and see if that works.
If switching the HDMI cable does not work, try hooking the Piper Computer Kit up to a different display, such as a computer monitor or a TV. You simply would take an HDMI cable and go from the Raspberry Pip to your monitor or TV. If this fixes your problem, then there is an issue with your Piper Computer Kit screen. If that does not work you may have a defective port on your Raspberry Pi.
My Piper Computer Kit is stalled on the "boot up" screen with a bunch of lines of code?
When booting up your Piper Computer, we have seen issues with the boot up procedure stalling. Troubleshooting tips are below.
You assemble your Piper Computer Kit, and when you go to turn it on all you see is this funky looking code. This means your SD Card is possibly corrupt. What now?
Here are the troubleshooting steps you can go through to check it out.
Find the SD Card on the right side of your Raspberry Pi and make sure it's securely pushed into the Raspberry Pi; check for dust, and try to reinsert it a few times.
Try removing your SD Card and restarting your Piper Computer Kit. If your screen switches to saying "No Signal" or goes from a blue screen to a black screen, you may have a corrupted SD Card.
Follow this guide (Scroll down to the header titled, “Download and Install Piper SD Card Image”) on how to reflash your card and you should be up and on your way. If you cannot do this, contact our customer support at hi@playpiper.com.
My Piper Computer Kit has an 8GB SD Card which doesn't allow me to update?
Our latest software requires a 16GB SD Card and the 2016 edition you purchased has an 8GB SD Card.
You may purchase a 16GB SD Card pre-loaded with our latest software through our online store.